Automation Example - Generating a Digital Surface Model
< Previous section Next section >
Move Point Cloud Files to Data Folder
Please note that this step is only required in order to follow the automation guide. In a real-world scenario, you probably already have some point clouds available. In such a case, you don’t necessarily need to move/copy this dataset to the data folder, but rather adjust the path to the raw data later in your project_config.py script!
In the previous section, we introduced the following folder structure:
project # top-level folder
├── data
├── scripts
└── processing
Download Test Data
Here you can find four laz-files, which we will use throughout this tutorial. This data is available from the Canton of Zurich under the CC-BY-4.0 license. Download these four files to follow the tutorial:
2716000_1241000.laz2716500_1241000.laz2716000_1241500.laz2716500_1241500.laz
You can test the workflow on fewer laz-files (e.g., just two files) or many more files, depending on your processing capabilities. You could also only download a single file. However, the concept is best illustrated when having two or more files of point cloud data to start with!
Create a Project Folder and Move the Data
Now we will setup the folder structure step-by-step. First create the project folder somewhere on your computer and create the data subdirectory. Then, copy over the demo data (laz-files) that we just downloaded from the Canton of Zurich to the data directory, so that we end up with the following structure:
project # top-level folder
├── data
| ├── 2716000_1241000.laz
| ├── 2716500_1241000.laz
| ├── 2716000_1241500.laz
| └── 2716500_1241500.laz
├── scripts
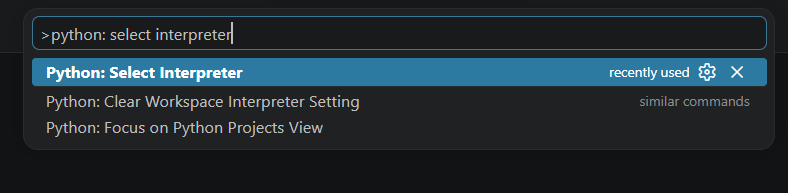
| └── ...Set Python Interpreter
Now, launch Visual Studio code and open the user settings by pressing “CTRL + SHIFT + P” and enter “select interpreter”. Then select “Python: Select interpreter” from the displayed suggestions.
Select the interpreter of your Conda environment (e.g. myenv)
Without selecting the right interpreter, you won’t get the correct syntax highlighting and auto-completion for the PySAGA package.
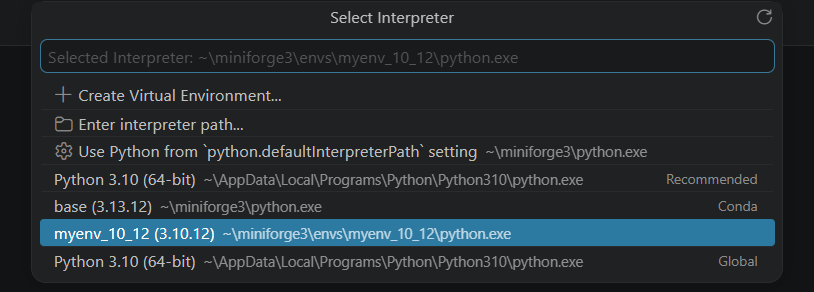
In this example you can see that three different Python versions exist: one conda-independent 3.10 Python, the 3.13 Python of the Conda Base environment and the 3.10.12 Conda environment suggested in this set of tutorials.
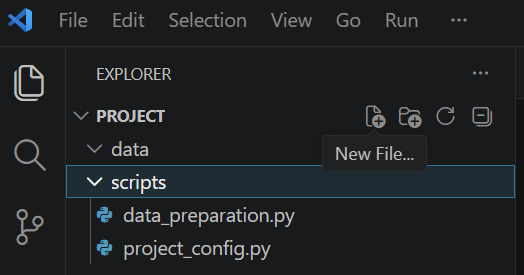
Generate Python Scripts
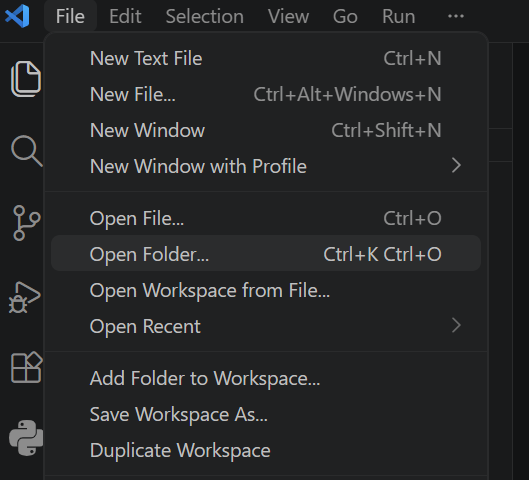
From within Visual Studio code, open the project folder using the top menu (File > Open Folder or use the shortcut Ctrl + K followed by Ctrl + O).
Create the scripts directory and then three empty Python scripts:
project # top-level folder
├── data
|   └── ...
├── scripts
|   ├── project_config.py
|   ├── data_preparation.py
|   └── run_script.py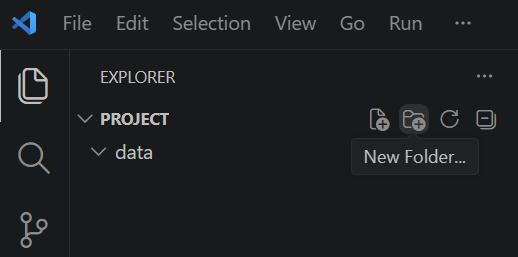
A Typical Configuration File
A basic structure for a project configuration looks like this:
import os
import sys

# windows specific setup - always make sure this path is correctly set
# otherwise you won't be able to access LIS Pro 3D tools with Python!
# please refer to the "Installation of LIS Pro 3D with Python" guide
# for how to correctly set this path!
os.environ["SAGA_PATH"] = r"C:\Program Files\Laserdata\LIS Pro 3D"
sys.path.insert(0, os.environ["SAGA_PATH"])

# ------------------------------------------------------------------------
# processing directories

# the main, top-level folder of the project
BASE_DIR = r""

# this folders should exist (e.g., be created manually before)
LAS_IN_DIR = ""

# these folders will be created when importing this script!
PROCESS_DIR = ""
GRIDS_DIR = ""
GRIDS_DIR_DELIVERY = ""
SHAPES_DIR = ""
### you can always define and create more (sub-)folders here!

# ------------------------------------------------------------------------
# create (non-existing) dirs


# ------------------------------------------------------------------------
# catalog of raw input data


# ------------------------------------------------------------------------
# output data


# ------------------------------------------------------------------------
# tool parameters- It starts by setting the LIS Pro 3D and PySAGA location
- After this, the processing directories are defined
- Then, the directories are created in your folder structure
- Inputs and outputs are defined
- Important parameter settings for the different tools to be called are defined
Fill project_config.py
For our processing example the script looks like this:
Use the Copy to Clipboard button in the upper-right corner of the code block in order to copy the whole code block in one go. Paste the code into your empty script!
import os
import sys

# path of PySAGA package
os.environ["SAGA_PATH"] = r"C:\Program Files\Laserdata\LIS Pro 3D"
sys.path.insert(0, os.environ["SAGA_PATH"])

# ------------------------------------------------------------------------
# processing directories

# the main, top-level folder of the project
BASE_DIR = r"C:\LiDAR_Data\project"

# this folders should exist (e.g., be created manually before)
# (set this to the folder of your las/laz data, if not within project folder!)
LAS_IN_DIR = os.path.join(BASE_DIR, "data")

# these folders will be created when importing this script!
PROCESS_DIR = os.path.join(BASE_DIR, "processing")

GRIDS_DIR = os.path.join(PROCESS_DIR, "grids")
DSM_DIR = os.path.join(GRIDS_DIR, "dsms")
DTM_DIR = os.path.join(GRIDS_DIR, "dtms")

GRIDS_DIR_DELIVERY = os.path.join(PROCESS_DIR, "grids_delivery")
SHAPES_DIR = os.path.join(PROCESS_DIR, "shapes")

# ------------------------------------------------------------------------
# create (non-existing) dirs
os.makedirs(PROCESS_DIR, exist_ok=True)
os.makedirs(GRIDS_DIR, exist_ok=True)
os.makedirs(DSM_DIR, exist_ok=True)
os.makedirs(DTM_DIR, exist_ok=True)

os.makedirs(GRIDS_DIR_DELIVERY, exist_ok=True)
os.makedirs(SHAPES_DIR, exist_ok=True)

# ------------------------------------------------------------------------
# catalog of raw input data
LASVF = os.path.join(LAS_IN_DIR, "tiles.lasvf")

# output data
GRID_VRT_DSM = os.path.join(DSM_DIR, "output_dsm.vrt")
TILESCHEME_RAW_DATA = os.path.join(SHAPES_DIR, "tilescheme_raw_data.shp")
PROCESSING_UNITS = os.path.join(SHAPES_DIR, "processing_units.shp")
DELIVERY_UNITS = os.path.join(SHAPES_DIR, "delivery_units.shp")

# ------------------------------------------------------------------------
# tool parameters

# EPSG:2056 — CH1903+ / LV95 (Swiss projected coordinate system)
PROJ = "+proj=somerc +lat_0=46.95240555555556 +lon_0=7.439583333333333 +k_0=1 +x_0=2600000 +y_0=1200000 +ellps=bessel +towgs84=674.374,15.056,405.346,0,0,0,0 +units=m +no_defs"

# grid resolution in [m] for the resulting DEM
OUTPUT_RESOLUTION = 0.5

# size of processing units in [m]
TILE_SIZE = 200
# the buffer added to the processing unit to avoid edge effects
OVERLAP = OUTPUT_RESOLUTION * 20
# size of delivery units in [m]
TILE_SIZE_DELIVERY = 100
Note that PROCESS_DIR is defined as a subfolder of BASE_DIR and that (in this example) the folders GRIDS_DIR,GRIDS_DIR_DELIVERY and SHAPES_DIR are subfolders of PROCESS_DIR. Thus, only the BASE_DIR is an absolute path.
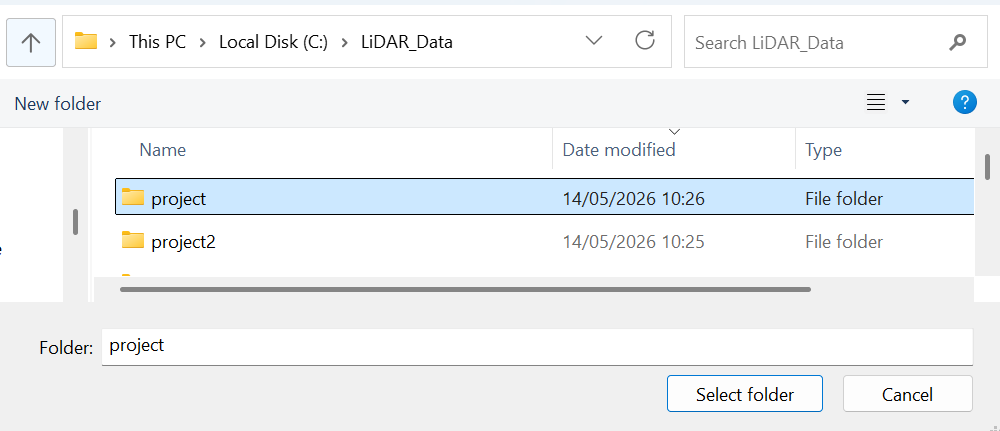
In order to set the BASEDIR, you can simply select the project folder in the File Explorer and use the shortcut Crtl + Shift + C or right-click and choose Copy as path.
Paste the path into the project_config.py and make sure you define it as a raw string (r"C:\LiDAR_Data\project")
Later, when importing this configuration, the necessary subdirectories will be automatically created!
The neat thing about our project_config.py is that for running the same set of task on another project you can just simply reuse all scripts and you only need to adjust the BASE_DIR path for the new project!
A Typical Task-Oriented Script
Now that we have prepared the project_config.py, we can start writing an actual task-oriented script. This is a basic skeleton for a task-oriented script.
import os

import project_config as cfg

from PySAGA import saga_api, lis_cmd

from PySAGA.tools import *


def task():
    lis_cmd.Message_Print("Hello World")

    saga_api.SG_Get_Data_Manager().Delete()
    return True


if __name__ == "__main__":
    starttime = lis_cmd.Start_Logging(False)

    result = task()

    if not result:
        lis_cmd.Error_Exit("Processing task failed", starttime)

    lis_cmd.Stop_Logging(starttime)
It consists of five general sections
- The import of
project_config, which provides access to the PySAGA package as well as all folder and parameter definitions.
This import should always be placed at the top of the script.
Note that our task-oriented scripts will all import the project_config.py.
import project_config as cfgWith this import, a namespace called “cfg” is defined. Thereby the user doesn’t have to type the whole name (project_config) but can use the shorter name cfg instead.
Doing so, we are able to use the variable names defined in the project_config.py. The only thing we have to do is using the correct namespace (here “cfg”).
E.g., if we want to use the variable LAS_IN_DIR (pointing to the filepath where all the LAS/LAZ files are located), we have to type cfg.LAS_IN_DIR.
The import of
saga_apiandlis_cmd, which provide access to low-level functionality and basic helper methods.The import of the PySAGA.tools, which provide access to all available SAGA-GIS and LIS Pro 3D tools via Python.
The definition of the
task()function.
This function will later contain the actual processing workflow. In this example, it only prints"Hello World".The
__main__section, where the script execution is controlled.
The__main__block starts logging, executes thetask()function, checks whether the task completed successfully, and finally stops logging.
Fill data_preparation.py
In our example the script performs the following tasks:
- Create a file list of all available las or laz files
- Create a LAS/LAZ index for all listed LAS/LAZ files via
lis_io.Create_LASLAZ_Index - Create a (virtual) point cloud catalog for all listed files via
lis_virtual.Create_Virtual_LASLAZ_Dataset
The virtual point cloud catalog allows to treat the set of point cloud files as one single dataset. The user does not have to take care of any tile borders and can treat the dataset as just one. The concept also applies to country-wide datasets with thousands of tiles.
- Create a vector layer with the bounding boxes of the files in the point cloud catalog via
lis_virtual.Create_Tileshape_from_Virtual_LASLAZ - Create a tiling scheme of processing units via
lis_tools.Create_Spatial_Processing_Units
import os

import project_config as cfg
from PySAGA import saga_api, lis_cmd
from PySAGA.tools import *


def prepare_data():
    inputfiles = lis_cmd.Create_File_List(
        cfg.LAS_IN_DIR,
        ".las;.laz",
        os.path.join(cfg.LAS_IN_DIR, "lasvf_input_file_list.txt"),
    )

    if not lis_io.Create_LASLAZ_Index(
        FILES="",
        INPUT_FILE_LIST=inputfiles,
        INDEX_ALL=True,
        TILE_SIZE=0.000000,
        THRESHOLD=1000,
        MIN_POINTS=100000,
        MAX_INTERVALS=-20,
    ):
        return lis_cmd.Error_Return("Failed to execute tool")

    if not lis_virtual.Create_Virtual_LASLAZ_Dataset(
        FILES="",
        INPUT_FILE_LIST=inputfiles,
        FILENAME=cfg.LASVF,
        METHOD_PATHS="relative",
        COLOR_DEPTH="16 bit",
    ):
        return lis_cmd.Error_Return("Failed to execute tool")

    # tile scheme of input data
    tilescheme_raw_data = saga_api.SG_Get_Data_Manager().Add_Shapes()

    if not lis_virtual.Create_Tileshape_from_Virtual_LASLAZ(
        TILE_SHP=tilescheme_raw_data, FILENAME=cfg.LASVF
    ):
        return lis_cmd.Error_Return("Failed to execute tool")

    tilescheme_raw_data.Get_Projection().Create(
        saga_api.CSG_String(cfg.PROJ)
    )
    tilescheme_raw_data.Save(cfg.TILESCHEME_RAW_DATA)

    # tile scheme used for processing units
    processing_units = saga_api.SG_Get_Data_Manager().Add_Shapes()

    if not lis_tools.Create_Spatial_Processing_Units(
        SHP_EXTENT=tilescheme_raw_data,
        SHP_UNITS=processing_units,
        TILE_SIZE=cfg.TILE_SIZE,
    ):
        return lis_cmd.Error_Return("Failed to execute tool")

    processing_units.Get_Projection().Create(saga_api.CSG_String(cfg.PROJ))
    processing_units.Save(cfg.PROCESSING_UNITS)

    # tile scheme used for delivery units
    delivery_units = saga_api.SG_Get_Data_Manager().Add_Shapes()

    if not lis_tools.Create_Spatial_Processing_Units(
        SHP_EXTENT=tilescheme_raw_data,
        SHP_UNITS=delivery_units,
        TILE_SIZE=cfg.TILE_SIZE_DELIVERY,
    ):
        return lis_cmd.Error_Return("Failed to execute tool")

    delivery_units.Get_Projection().Create(saga_api.CSG_String(cfg.PROJ))
    delivery_units.Save(cfg.DELIVERY_UNITS)

    saga_api.SG_Get_Data_Manager().Delete()

    return True


if __name__ == "__main__":
    starttime = lis_cmd.Start_Logging(False)

    result = prepare_data()

    if not result:
        lis_cmd.Error_Exit("Processing task failed", starttime)

lis_cmd.Stop_Logging(starttime)You probably noticed that most tool calls are wrapped in an if-statement like this:
if not lis_io.Create_LASLAZ_Index(...):
    return lis_cmd.Error_Return("Failed to execute tool")
While not strictly necessary, we prefer to do this because it allows us to explicitly catch errors coming from SAGA GIS and LIS Pro 3D tool calls. Since the SAGA GIS and LIS Pro 3D tools written in C++ and wrapped for Python, this is the easiest way to catch errors during tool execution.
We already encountered two different types of tools in the script:
Tools such as
lis_io.Create_LASLAZ_Indexandlis_virtual.Create_Virtual_LASLAZ_Datasetwrite their results directly to disk.Tools such as
lis_virtual.Create_Tileshape_from_Virtual_LASLAZandlis_tools.Create_Spatial_Processing_UnitsproduceShapesobjects as outputs. These datasets are initially created only in memory and are saved to disk only when explicitly requested by the user (for example withdelivery_units.Save(cfg.DELIVERY_UNITS)).
For in-memory outputs, an empty dataset object must first be created manually:
tilescheme_raw_data = saga_api.SG_Get_Data_Manager().Add_Shapes()This empty object is then passed to the tool, which writes its output into the provided dataset object.
After processing, the dataset can either be passed directly to another tool for further processing, or be saved to disk using its Save(...) method.
Before the function terminates, all datasets currently stored in memory should be deleted:
saga_api.SG_Get_Data_Manager().Delete()A Typical Processing Script
Now that we have finalized data_preparation.py, which generates a tiling scheme from the extent of the available input data, we can create a processing script for the entire project area.
To keep memory usage manageable, the project area is processed in smaller processing units. Each unit should be small enough to fit into your computer’s memory.
The processing units are then processed sequentially, one after another.
The basic skeleton of a processing script looks like shown below:
import os

import project_config as cfg
from PySAGA import saga_api, lis_cmd
from PySAGA.tools import *


# ------------------------------------------------------------------------
# the processing pipeline in a single function; the function is called for each
# processing unit
# note: this would not be absolutely necessary here, but makes it easier to
# parallelize the script later on
def process_unit(unit_index):
    # --------------------------------------------------------------------
    # load the shapefile with the tiling scheme used for processing
    processing_units = saga_api.SG_Get_Data_Manager().Add_Shapes(
        cfg.PROCESSING_UNITS
    )

    if not processing_units:
        lis_cmd.Error_Return(
            f"Loading processing_units {cfg.PROCESSING_UNITS} failed"
        )

    # --------------------------------------------------------------------
    # get proc_unit to process
    proc_unit = processing_units.Get_Shape(unit_index)

    xmin = proc_unit.Get_Extent().Get_XMin()
    ymin = proc_unit.Get_Extent().Get_YMin()
    xmax = proc_unit.Get_Extent().Get_XMax()
    ymax = proc_unit.Get_Extent().Get_YMax()

    # units are referenced by their lower-left corner coordinate
    unit_name = f"{int(xmin)}_{int(ymin)}"

    lis_cmd.Message_Print(f"\nProcessing unit {unit_name} \n")

    # --------------------------------------------------------------------
    # free memory resources and return success
    saga_api.SG_Get_Data_Manager().Delete()

    return True


if __name__ == "__main__":
    starttime = lis_cmd.Start_Logging(False)

    # --------------------------------------------------------------------
    # load the shapefile with the tiling scheme used for processing
    processing_units = saga_api.SG_Get_Data_Manager().Add_Shapes(
        cfg.PROCESSING_UNITS
    )

    if not processing_units:
        lis_cmd.Error_Exit(
            f"Loading processing_units {cfg.PROCESSING_UNITS} failed",
            starttime,
            True,
        )

    lis_cmd.Message_Print(
        f"Number of units to process: {processing_units.Get_Count()} \n\n"
    )

    # --------------------------------------------------------------------
    # iterate over the processing units and process each unit by calling
    # the process_unit function with the processing pipeline
    for unit_index in range(processing_units.Get_Count()):
        result = process_unit(unit_index)

        if not result:
            lis_cmd.Error_Exit("Processing task failed", starttime)

    # --------------------------------------------------------------------
    # free memory and stop logging
    saga_api.SG_Get_Data_Manager().Delete()

    lis_cmd.Stop_Logging(starttime)
It includes the following sections:
A sequence of imports
The definition of the
process_unit()function. The function now takes aunit_indexas an input argument and loads the previously generatedprocessing_unitsdataset into memory. Using theunit_index, a single processing unit (proc_unit) is extracted from the complete tiling scheme. The spatial extent of this processing unit is then retrieved. This extent will later be used to perform targeted spatial queries on the full dataset, allowing the workflow to process only the data relevant for the current processing unit.The
__main__section, where the script execution is controlled.
Besides starting the logging and finally stopping the logging, it loads theprocessing_unitsdataset into memory. Instead of calling theprocess_unit()function only once, it iterates through the individual spatial units of theprocessing_unitsdataset and calls the function in every iteration.This structure allows the complete project area to be processed sequentially, one processing unit at a time. After all processing units have been processed, the remaining in-memory datasets are deleted and logging is stopped.
Fill data_processing.py
The example processing script defines the actual processing steps:
- It reads the extent of the current processing unit from the tiling scheme (and adds an overlap to avoid edge effects)
- It retrieves the actual point cloud data for this processing unit via
lis_virtual.Get_Subset_from_Virtual_LASLAZ - It applies an operation to this point cloud - in this case it produces a Digital Surface Model (DSM) via
lis_conversion.Point_Cloud_to_Grid - It removes the overlap again and clips the processing unit to its original extent (defined in the tiling scheme)
- It saves the resulting grid
The output for each processing unit is named and referenced by the coordinates of the lower left corner. This allows for a unique identification within the project.
import os

import project_config as cfg
from PySAGA import saga_api, lis_cmd
from PySAGA.tools import *


# ------------------------------------------------------------------------
# the processing pipeline in a single function; the function is called for each
# processing unit
# note: this would not be absolutely necessary here, but makes it easier to
# parallelize the script later on
def process_unit(unit_index):
    # --------------------------------------------------------------------
    # load the shapefile with the tiling scheme used for processing
    processing_units = saga_api.SG_Get_Data_Manager().Add_Shapes(
        cfg.PROCESSING_UNITS
    )

    if not processing_units:
        lis_cmd.Error_Return(
            f"Loading processing_units {cfg.PROCESSING_UNITS} failed"
        )

    # --------------------------------------------------------------------
    # get proc_unit to process
    proc_unit = processing_units.Get_Shape(unit_index)

    xmin = proc_unit.Get_Extent().Get_XMin()
    ymin = proc_unit.Get_Extent().Get_YMin()
    xmax = proc_unit.Get_Extent().Get_XMax()
    ymax = proc_unit.Get_Extent().Get_YMax()

    # units are referenced by their lower-left corner coordinate
    unit_name = f"{int(xmin)}_{int(ymin)}"

    lis_cmd.Message_Print(f"\nProcessing unit {unit_name} \n")

    # --------------------------------------------------------------------
    # query point cloud from virtual point cloud dataset
    pc_out_list = []

    if not lis_virtual.Get_Subset_from_Virtual_LASLAZ(
        PC_OUT=pc_out_list,
        FILENAME=cfg.LASVF,
        COPY_ATTR=True,
        CONSTRAIN_QUERY=False,
        FILE_COMPRESSION=True,
        ERROR_IF_EMPTY=True,
        THIN_OUT=False,
        AOI_XRANGE=f"{xmin};{xmax}",
        AOI_YRANGE=f"{ymin};{ymax}",
        SKIP_EMPTY_AOIS=True,
        METHOD_CLIP="complete boundary is inside",
    ):
        return lis_cmd.Error_Return(
            f"Failed to execute tool on processing unit {unit_name}"
        )

    # check if there is valid data in the proc_unit
    if len(pc_out_list) < 1:
        return lis_cmd.Error_Return(
            f"Processing unit {unit_name} contains no point cloud data, skipping!"
        )

    # add the point cloud datasets to the data manager for easier memory management
    pc = saga_api.SG_Get_Data_Manager().Add(pc_out_list[0]).asPointCloud()

    if pc.Get_Count() < 1:
        return lis_cmd.Error_Return(
            f"pointcloud contains no points, skipping!"
        )

    dsm = saga_api.SG_Get_Data_Manager().Add_Grid()

    if not lis_conversion.Point_Cloud_to_Grid(
        PC_IN=pc,
        TARGET_OUT_GRID=dsm,
        ZFIELD="Z",
        METHOD="max",
        USE_ATTR_RANGE=False,
        USE_Z_RANGE=False,
        USE_RADIUS=False,
        TARGET_DEFINITION="user defined",
        TARGET_USER_SIZE=cfg.OUTPUT_RESOLUTION,
        TARGET_USER_XMIN=xmin,
        TARGET_USER_XMAX=xmax,
        TARGET_USER_YMIN=ymin,
        TARGET_USER_YMAX=ymax,
        TARGET_USER_FITS="cells",
    ):
        return lis_cmd.Error_Return(f"Failed to generate DSM")

    # remove buffer of processing unit before saving
    # input list for clip tool
    grids_list = [dsm]
    # output list for clip tool
    clipped_list = []

    if not grid_tools.Clip_Grids(
        GRIDS=grids_list,
        CLIPPED=clipped_list,
        EXTENT="user defined",
        XMIN=xmin,
        XMAX=xmax,
        YMIN=ymin,
        YMAX=ymax,
        BUFFER=0.0,
    ):
        return lis_cmd.Error_Return(f"Failed to clip DSM")

    if len(clipped_list) < 1:
        return lis_cmd.Error_Return(
            f"Unit contains no grid data, skipping!"
        )

    dsm_out = saga_api.SG_Get_Data_Manager().Add(clipped_list[0]).asGrid()

    dsm_out.Get_Projection().Create(saga_api.CSG_String(cfg.PROJ))
    dsm_out.Save(os.path.join(cfg.DSM_DIR, f"{unit_name}_dsm.tif"))

    # --------------------------------------------------------------------
    # free memory resources and return success
    saga_api.SG_Get_Data_Manager().Delete()

    return True


if __name__ == "__main__":
    starttime = lis_cmd.Start_Logging(False)

    # --------------------------------------------------------------------
    # load the shapefile with the tiling scheme used for processing
    processing_units = saga_api.SG_Get_Data_Manager().Add_Shapes(
        cfg.PROCESSING_UNITS
    )

    if not processing_units:
        lis_cmd.Error_Exit(
            f"Loading processing_units {cfg.PROCESSING_UNITS} failed",
            starttime,
            True,
        )

    lis_cmd.Message_Print(
        f"Number of units to process: {processing_units.Get_Count()} \n\n"
    )

    # --------------------------------------------------------------------
    # iterate over the processing units and process each unit by calling the process_unit function
    # with the processing pipeline
    for unit_index in range(processing_units.Get_Count()):
        result = process_unit(unit_index)

        if not result:
            lis_cmd.Error_Exit("Processing task failed", starttime)

    # --------------------------------------------------------------------
    # free memory and stop logging
    saga_api.SG_Get_Data_Manager().Delete()

lis_cmd.Stop_Logging(starttime)In the processing script we encountered two other types of tools:
1 Tool with Output List
The tool lis_virtual.Get_Subset_from_Virtual_LASLAZ generates an output list. Therefore an empty python list object has to be created before tool execution (pc_out_list = []). After execution it has to be checked if the list has any entries:
if len(pc_out_list) < 1:
    return lis_cmd.Error_Return(
        f"Processing unit {unit_name} contains no point cloud data, skipping!"
    )
In our case we expect one contained point cloud object (index 0). We have to add this to the data manager and store it in a new point cloud object (pc).
pc = saga_api.SG_Get_Data_Manager().Add(pc_out_list[0]).asPointCloud()Finally, we also have to test if the extracted point cloud contains any points:
if pc.Get_Count() < 1:
    return lis_cmd.Error_Return(
        f"pointcloud contains no points, skipping!"
    )
2 Tool with Input and Output List
The tool grid_tools.Clip_Grids expects it’s input to be a Python List containing saga_api.CSG_Grid objects. Therefore we can simply define a list and put the resulting grid object of the previous tool into it.
grids_list = [dsm]The tool also generates an output list. Therefore an empty python list object has to be created before tool execution (clipped_list = []). After execution it has to be checked if the list has any entries.
Note that we explicitly set the projection of the dsm to cfg.PROJ (EPSG:2056 — CH1903+ / LV95 (Swiss projected coordinate system)), defined in the project_config.py.
Sometimes an explicit definition of the to-wgs84 parameters is useful for non-wgs84 projections.
Customizing and Adapting Scripts to Your Needs
What if you want to add new or different processing capabilities to the process_unit function? In such a case, you need to extend the process_unit(...)-function. Let’s say, we would like to additionally create a Digital Terrain Model (DTM) from the point cloud. Therefore, we need to aggregate points that belong to the “Ground” class (LAS class 2) and take the mean elevation (Z value) for each grid cell.
First, we open the respective tool in the GUI and adjust the settings to our needs. Right click on the tool in the tools tab to open the context menu and select Copy to Clipboard.
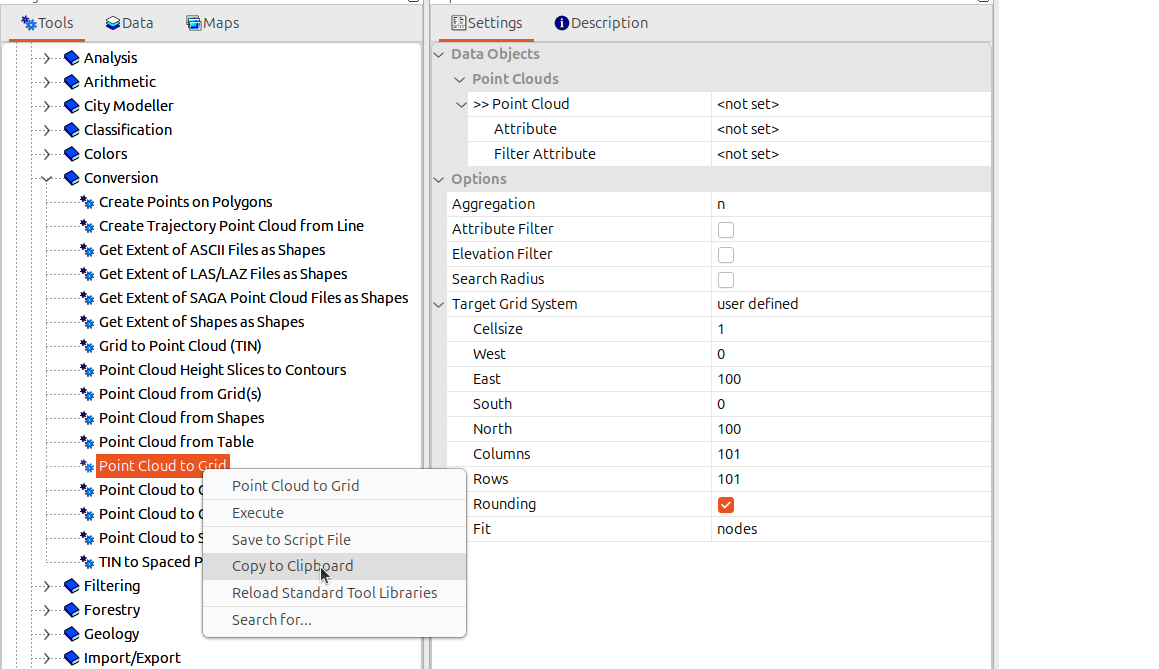
Now select the following settings for copying:
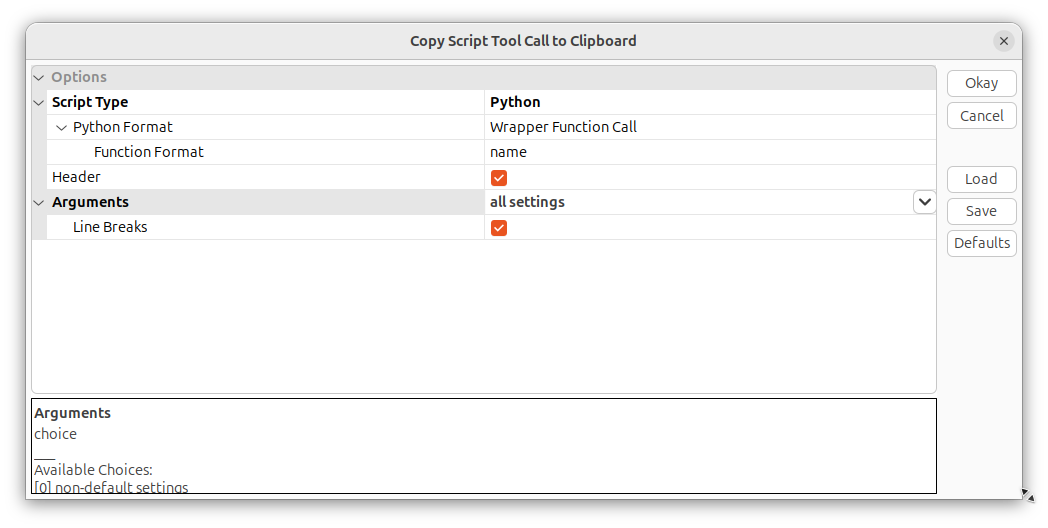
This will give you the following “raw” code snippet:
from PySAGA.tools import lis_conversion

# input data object
pc_in = saga_api.SG_Get_Data_Manager().Add_PointCloud("data object file")
# output data object
target_out_grid = saga_api.SG_Get_Data_Manager().Add_Grid()

lis_conversion.Point_Cloud_to_Grid(
    PC_IN=pc_in,
    TARGET_OUT_GRID=target_out_grid,
    ZFIELD="<no attributes>",
    FIELD_FILTERATTR="<no attributes>",
    METHOD="n",
    PTH=25.000000,
    TRIM=25.000000,
    USE_ATTR_RANGE=False,
    ATTR_RANGE="0; 10",
    USE_Z_RANGE=False,
    Z_RANGE="0; 1000",
    USE_RADIUS=False,
    RADIUS=5.000000,
    METHOD_RADIUS="Fast Computation",
    FILTER_RANGE="2; 2",
    TARGET_DEFINITION="user defined",
    TARGET_USER_SIZE=1.000000,
    TARGET_USER_XMIN=0.000000,
    TARGET_USER_XMAX=100.000000,
    TARGET_USER_YMIN=0.000000,
    TARGET_USER_YMAX=100.000000,
    TARGET_USER_COLS=101,
    TARGET_USER_ROWS=101,
    TARGET_USER_FLAT=True,
    TARGET_USER_FITS="nodes",
    TARGET_SYSTEM="0; 0; 0; 0; 0",
)
Why “raw”? Because you need to adapt and fill in a few things! Let’s go through the code step-by-step.
The bit below imports the Python tool wrapper used to call the lis_conversion tool. We can delete it, since we already import all lis-tools in our script via from PySAGA.tools import *!
from PySAGA.tools import lis_conversion # to be deletedLikewise, we can delete the following line, since we already have point cloud data that we can pass to the function:
# input data object
pc_in = saga_api.SG_Get_Data_Manager().Add_PointCloud("data object file")
The target_out_grid will be our output dtm file. Therefore we rename it from
target_out_grid = ...to
dtm_out = ...We need to modify and remove unnessesary tool parameters, changing the call from
lis_conversion.Point_Cloud_to_Grid(
    PC_IN=pc_in,
    TARGET_OUT_GRID=target_out_grid,
    ZFIELD="<no attributes>",
    FIELD_FILTERATTR="<no attributes>",
    METHOD="n",
    PTH=25.000000,
    TRIM=25.000000,
    USE_ATTR_RANGE=False,
    ATTR_RANGE="0; 10",
    USE_Z_RANGE=False,
    Z_RANGE="0; 1000",
    USE_RADIUS=False,
    RADIUS=5.000000,
    METHOD_RADIUS="Fast Computation",
    FILTER_RANGE="2; 2",
    TARGET_DEFINITION="user defined",
    TARGET_USER_SIZE=1.000000,
    TARGET_USER_XMIN=0.000000,
    TARGET_USER_XMAX=100.000000,
    TARGET_USER_YMIN=0.000000,
    TARGET_USER_YMAX=100.000000,
    TARGET_USER_COLS=101,
    TARGET_USER_ROWS=101,
    TARGET_USER_FLAT=True,
    TARGET_USER_FITS="nodes",
    TARGET_SYSTEM="0; 0; 0; 0; 0",
)
to
lis_conversion.Point_Cloud_to_Grid(
    PC_IN=pc,  # set the input to our own point cloud called "pc"
    TARGET_OUT_GRID=dtm_out,
    ZFIELD="Z",  # aggregate elevation/Z
    FIELD_FILTERATTR="classification",  # filter points / only consider "FILTER_RANGE"
    METHOD="mean",  # take the mean Z value per grid cell
    FILTER_RANGE="2; 2",  # 2 corresponds to the ground class
    TARGET_DEFINITION="user defined",
    TARGET_USER_SIZE=cfg.OUTPUT_RESOLUTION,
    TARGET_USER_XMIN=xmin,
    TARGET_USER_XMAX=xmax,
    TARGET_USER_YMIN=ymin,
    TARGET_USER_YMAX=ymax,
    TARGET_USER_FITS="cells",
)
Finally, we integrate the code in the process_unit function:
def process_unit(unit_index):
    # --------------------------------------------------------------------
    # load the shapefile with the tiling scheme used for processing
    processing_units = saga_api.SG_Get_Data_Manager().Add_Shapes(
        cfg.PROCESSING_UNITS
    )

    if not processing_units:
        lis_cmd.Error_Return(
            f"Loading processing_units {cfg.PROCESSING_UNITS} failed"
        )

    # --------------------------------------------------------------------
    # get unit to process
    proc_unit = processing_units.Get_Shape(unit_index)

    xmin = proc_unit.Get_Extent().Get_XMin()
    ymin = proc_unit.Get_Extent().Get_YMin()
    xmax = proc_unit.Get_Extent().Get_XMax()
    ymax = proc_unit.Get_Extent().Get_YMax()

    # units are referenced by their lower-left corner coordinate
    unit_name = f"{int(xmin)}_{int(ymin)}"

    lis_cmd.Message_Print(f"\nProcessing unit {unit_name} \n")

    # --------------------------------------------------------------------
    # query point cloud from virtual point cloud dataset
    pc_out_list = []

    if not lis_virtual.Get_Subset_from_Virtual_LASLAZ(
        PC_OUT=pc_out_list,
        FILENAME=cfg.LASVF,
        COPY_ATTR=True,
        CONSTRAIN_QUERY=False,
        FILE_COMPRESSION=True,
        ERROR_IF_EMPTY=True,
        THIN_OUT=False,
        AOI_XRANGE=f"{xmin};{xmax}",
        AOI_YRANGE=f"{ymin};{ymax}",
        SKIP_EMPTY_AOIS=True,
        METHOD_CLIP="complete boundary is inside",
    ):
        return lis_cmd.Error_Return(f"Failed to execute tool on unit")

    # check if the processing unit contains any valid data
    if len(pc_out_list) < 1:
        return lis_cmd.Error_Return(
            f"Unit contains no point cloud data, skipping!"
        )

    # add the point cloud datasets to the data manager for easier memory management
    pc = saga_api.SG_Get_Data_Manager().Add(pc_out_list[0]).asPointCloud()

    if pc.Get_Count() < 1:
        return lis_cmd.Error_Return(
            f"pointcloud contains no points, skipping!"
        )

    dsm = saga_api.SG_Get_Data_Manager().Add_Grid()

    if not lis_conversion.Point_Cloud_to_Grid(
        PC_IN=pc,
        TARGET_OUT_GRID=dsm,
        ZFIELD="Z",
        METHOD="max",
        USE_ATTR_RANGE=False,
        USE_Z_RANGE=False,
        USE_RADIUS=False,
        TARGET_DEFINITION="user defined",
        TARGET_USER_SIZE=cfg.OUTPUT_RESOLUTION,
        TARGET_USER_XMIN=xmin,
        TARGET_USER_XMAX=xmax,
        TARGET_USER_YMIN=ymin,
        TARGET_USER_YMAX=ymax,
        TARGET_USER_FITS="cells",
    ):
        return lis_cmd.Error_Return(f"Failed to generate DSM")

    # remove buffer of processing unit before saving
    grids_list = [
        dsm
    ]  # Python list with input data objects of type 'saga_api.CSG_Grid'
    clipped_list = (
        []
    )  # Python list, will become filled after successful execution with output data objects of type 'saga_api.CSG_Grid'

    if not grid_tools.Clip_Grids(
        GRIDS=grids_list,
        CLIPPED=clipped_list,
        EXTENT="user defined",
        XMIN=xmin,
        XMAX=xmax,
        YMIN=ymin,
        YMAX=ymax,
        BUFFER=0.0,
    ):
        return lis_cmd.Error_Return(f"Failed to clip DSM")

    if len(clipped_list) < 1:
        return lis_cmd.Error_Return(
            f"Unit contains no grid data, skipping!"
        )

    dsm_out = saga_api.SG_Get_Data_Manager().Add(clipped_list[0]).asGrid()

    dsm_out.Get_Projection().Create(saga_api.CSG_String(cfg.PROJ))
    dsm_out.Save(os.path.join(cfg.DSM_DIR, f"{unit_name}_dsm.tif"))

    dtm = saga_api.SG_Get_Data_Manager().Add_Grid()

    if not lis_conversion.Point_Cloud_to_Grid(
        PC_IN=pc,
        TARGET_OUT_GRID=dtm,
        ZFIELD="Z",
        FIELD_FILTERATTR="classification",
        METHOD="mean",
        FILTER_RANGE="2; 2",
        TARGET_DEFINITION="user defined",
        TARGET_USER_SIZE=cfg.OUTPUT_RESOLUTION,
        TARGET_USER_XMIN=xmin,
        TARGET_USER_XMAX=xmax,
        TARGET_USER_YMIN=ymin,
        TARGET_USER_YMAX=ymax,
        TARGET_USER_FITS="cells",
    ):
        return lis_cmd.Error_Return(f"Failed to generate DTM")

    # the dtm often is a very sparse point cloud and needs to be closed
    if not grid_tools.Close_Gaps(INPUT=dtm):
        return lis_cmd.Error_Return(f"Failed to close DTM")

    # input list for clip tool
    grids_list = [dtm]
    # output list for clip tool
    clipped_list = []

    if not grid_tools.Clip_Grids(
        GRIDS=grids_list,
        CLIPPED=clipped_list,
        EXTENT="user defined",
        XMIN=xmin,
        XMAX=xmax,
        YMIN=ymin,
        YMAX=ymax,
        BUFFER=0.0,
    ):
        return lis_cmd.Error_Return(f"Failed to clip DSM")

    if len(clipped_list) < 1:
        return lis_cmd.Error_Return(
            f"Unit contains no grid data, skipping!"
        )

    dtm_out = saga_api.SG_Get_Data_Manager().Add(clipped_list[0]).asGrid()

    dtm_out.Get_Projection().Create(saga_api.CSG_String(cfg.PROJ))
    dtm_out.Save(os.path.join(cfg.DTM_DIR, f"{unit_name}_dtm.tif"))

    # --------------------------------------------------------------------
    # free memory resources and return success
    saga_api.SG_Get_Data_Manager().Delete()

    return True
Later, we would like to create a virtual raster catalog for both the DSM and the DTM. The project_config.py already contains an entry for this file for the DSM (GRID_VRT_DSM = ...) but this is still missing for the DTM, which we just added to our processing chain. Hence, we add such an entry to our config:
import os
import sys

# path of PySAGA package
os.environ["SAGA_PATH"] = r"C:\Program Files\Laserdata\LIS Pro 3D"
sys.path.insert(0, os.environ["SAGA_PATH"])

# ------------------------------------------------------------------------
# processing directories

# the main, top-level folder of the project
BASE_DIR = r"C:\LiDAR_Data\project"

# this folders should exist (e.g., be created manually before)
# (set this to the folder of your las/laz data, if not within project folder!)
LAS_IN_DIR = os.path.join(BASE_DIR, "data")

# these folders will be created when importing this script!
PROCESS_DIR = os.path.join(BASE_DIR, "processing")

GRIDS_DIR = os.path.join(PROCESS_DIR, "grids")
DSM_DIR = os.path.join(GRIDS_DIR, "dsms")
DTM_DIR = os.path.join(GRIDS_DIR, "dtms")

GRIDS_DIR_DELIVERY = os.path.join(PROCESS_DIR, "grids_delivery")
SHAPES_DIR = os.path.join(PROCESS_DIR, "shapes")

# ------------------------------------------------------------------------
# create (non-existing) dirs
os.makedirs(PROCESS_DIR, exist_ok=True)
os.makedirs(GRIDS_DIR, exist_ok=True)
os.makedirs(DSM_DIR, exist_ok=True)
os.makedirs(DTM_DIR, exist_ok=True)

os.makedirs(GRIDS_DIR_DELIVERY, exist_ok=True)
os.makedirs(SHAPES_DIR, exist_ok=True)

# ------------------------------------------------------------------------
# catalog of raw input data
LASVF = os.path.join(LAS_IN_DIR, "tiles.lasvf")

# output data
GRID_VRT_DSM = os.path.join(DSM_DIR, "output_dsm.vrt")
GRID_VRT_DTM = os.path.join(DSM_DIR, "output_dtm.vrt")
TILESCHEME_RAW_DATA = os.path.join(SHAPES_DIR, "tilescheme_raw_data.shp")
PROCESSING_UNITS = os.path.join(SHAPES_DIR, "processing_units.shp")
DELIVERY_UNITS = os.path.join(SHAPES_DIR, "delivery_units.shp")

# ------------------------------------------------------------------------
# tool parameters

# EPSG:2056 — CH1903+ / LV95 (Swiss projected coordinate system)
PROJ = "+proj=somerc +lat_0=46.95240555555556 +lon_0=7.439583333333333 +k_0=1 +x_0=2600000 +y_0=1200000 +ellps=bessel +towgs84=674.374,15.056,405.346,0,0,0,0 +units=m +no_defs"

# grid resolution in [m] for the resulting DEM
OUTPUT_RESOLUTION = 0.5

# size of processing units in [m]
TILE_SIZE = 200
# the buffer added to the processing unit to avoid edge effects
OVERLAP = OUTPUT_RESOLUTION * 20
# size of delivery units in [m]
TILE_SIZE_DELIVERY = 100